आज हम आपको IFMS 3.0 पर Group Management कैसे करें इसके बारे में इस ब्लॉक पोस्ट में बताएंगे ।
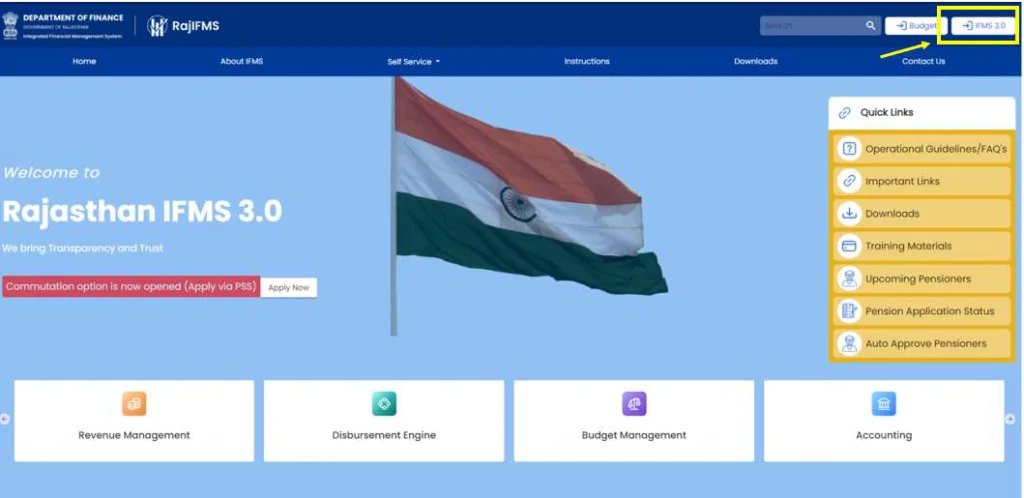
सबसे पहले वेब ब्राउज़र खोलें और URL में https://ifms.rajasthan.gov.in/ifmssso दर्ज करें।
लॉगिन बटन पर क्लिक करें।
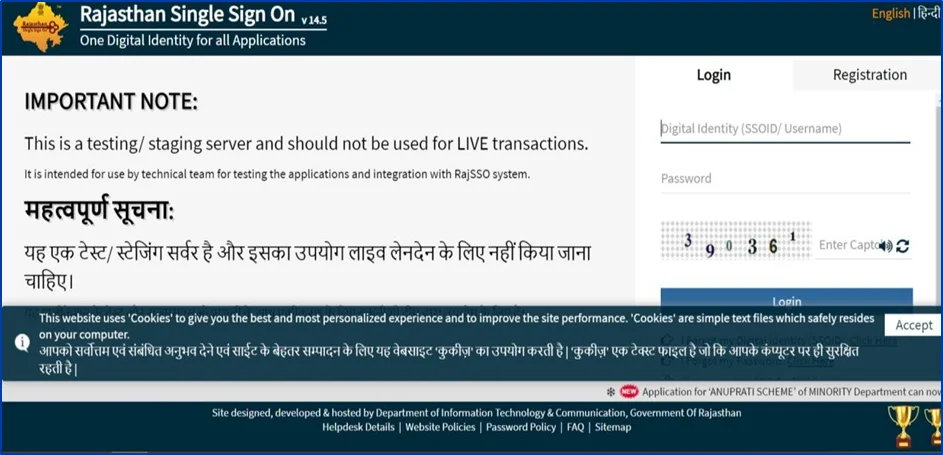
SSO लॉगिन पेज खुलता है, लॉगिन करने के लिए कृपया अपना SSO (यूजर आईडी, पासवर्ड और (कैप्चा) दर्ज करें)
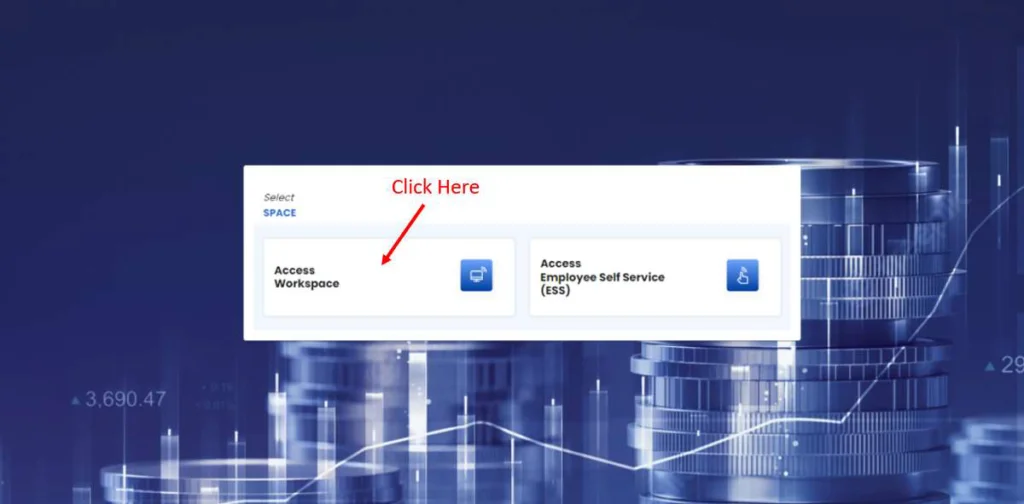
- SSO लॉगिन के बाद, आईएफएमएस 3.0 पर स्वागत पृष्ठ केवल तीन सेकंड के लिए दिखाई देता है। यह स्वचालित रूप से उपयोगकर्ता को कार्यालय से संबंधित कार्य के लिए (Access Workspace) वर्कस्पेस टाइल या (Access Employee Self Service)(ESS) स्वयं सेवा-संबंधी मामलों को प्रबंधित करने के लिए सेल्फ-सर्विस टाइल चुनने के लिए र्निर्देशित करता है।
- Access Workspace का उपयोग आधिकारिक उद्देश्यों के लिए, उच्च अधिकारियों द्वारा सौंपी/मैप की गई भूमिकाओं और कर्तव्यों को पूरा करने के लिए किया जाएगा।
- Access Employee Self Service(ESS) कर्मचारियों के लिए अनुरोध, वेतन पर्ची, छुट्टियां आदि बढ़ाने के लिए है।
नोट – कर्मचारी स्वयं सेवा (ESS) के तहत, कर्मचारी अपना विवरण देख या अपडेट कर सकता है और अनुरोध कर सकता है।
Access Workspace
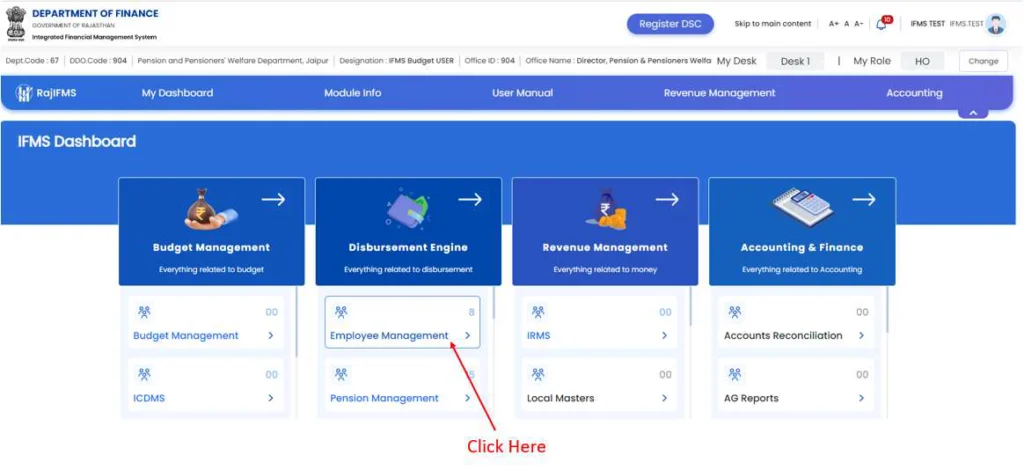
- नए कर्मचारी के लिए अनुरोध शुरू करने के लिए, उपयोगकर्ता – “एक्सेस वर्कस्पेस” टाइल का चयन करना है
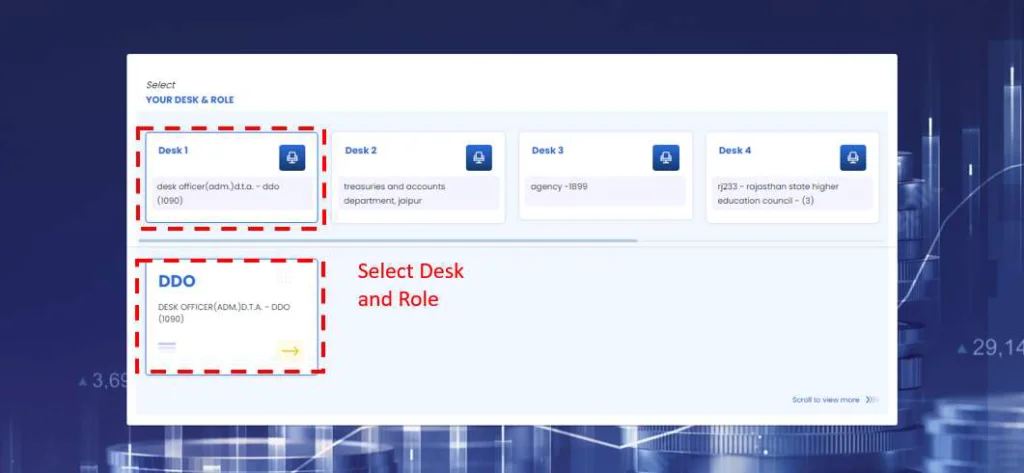
- स्क्रीन के ऊपरी भाग में, कार्यालयों के नाम के साथ एक या अधिक डेस्क दिखाई देंगे जिनके पास किस कर्मचारी का प्रभार है। जिस कर्मचारी का कार्यभार है उसका डेस्क (कार्यालय) चुनें।
ऊपरी हिस्से में टाइल के चयन के अनुसार, किसी कर्मचारी को सौंपी गई भूमिका स्क्रीन के निचले हिस्से में टाइल के रूप में दिखाई देगी।
- जैसे-जैसे ROLE का चयन होता है, डैशबोर्ड पेज उसके अनुसार खुलता जाता है।
- Activity Dashboard पृष्ठ खुल जाता है, इस पृष्ठ से उपयोगकर्ता आईडी, मेरी गतिविधियों की सूची (सभी कार्य), कार्य की स्थिति, कर्मचारी एमआईएस रिपोर्ट, त्वरित लिंक आदि की स्थिति देख सकता है।
- मेनू (बाईं ओर) से “कर्मचारी प्रबंधन (Employee Management)” पर क्लिक करें।
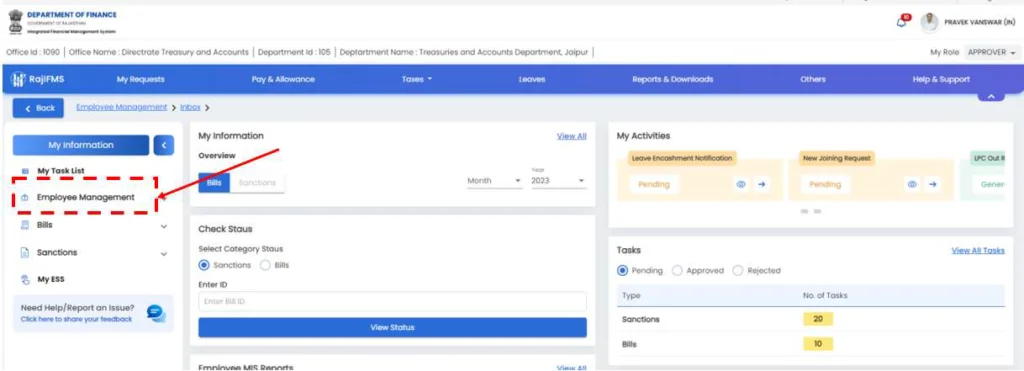
कर्मचारी प्रबंधन में कर्मचारी पंजीकरण, मंजूरी और बिल (वेतन और गैर-वेतन दोनों संबंधित) से संबंधित सभी प्रक्रियाएं शामिल हैं। इसमें कर्मचारी स्वयं सेवाएँ और कर्मचारी प्रबंधन से संबंधित समस्त सेवाएँ भी शामिल हैं।
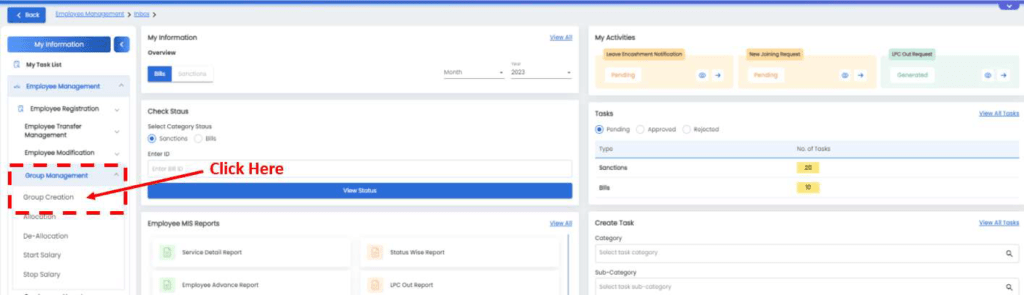
Click “Employee Management>> Group Management from the menu (Left side)
Group Management contains these options:
- Group Creation
- Allocation
- De- Allocation
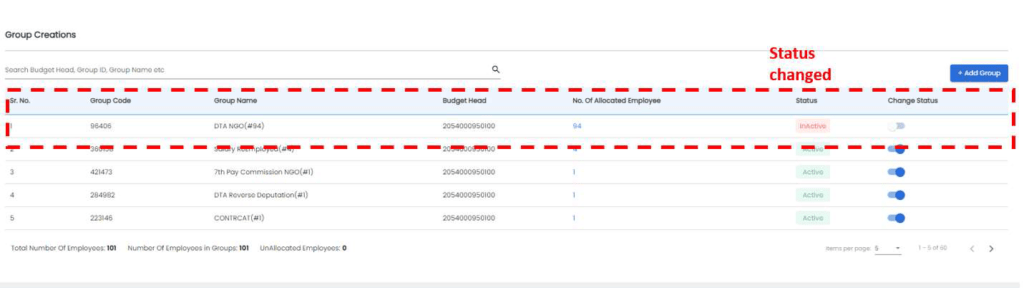
Change Status/ Group Creation
Change Status
This functionality will be used to change status/ create new group based on budget head as initial step in Pre-salary process. Groups are created by authorized user as part of employee management to group a set of employees for processing bills like – Salary bill etc.
A group can be used for any kind of bill according to object Head. It is mandatory for each office to combine employees into employee groups. Any employee who is not in any group needs to be added to make sure employee’s salary is processed.
Click “Employee Management>> Group Management >> Group Creation from the menu (Left side)
- To change the status of any group from Active to Inactive or vice-versa, User shall click the slide button as displayed in the screen below.

- Click “Yes” button to change the status

- Successful message gets displayed.

- Status changed for the group
Group Creation
- To Add new group, click “Add Group” button

- Please select – Non-sharing based/ Sharing based radio button and enter the required details and click “Submit” button
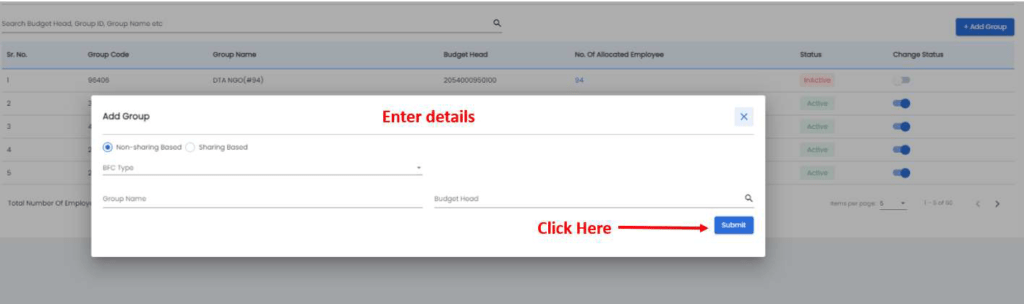
- Successful message get displayed

Success message screens unavailable
Group Allocation
DDO can assign group to an employee, who has not been attached with any of group. A list of employee(s) will appear in this option who are not attached with any of group. This functionality will be used for allocating the employee to a group for Salary Bill processing.To allocate group- please select Employee first then select group from drop down list of group(s).
Click “Employee Management>> Group Management >> Allocation from the menu (Left side)

- Click Group Name filter to get the drop down list

- Please select the Group Name

- Tick the Allocate checkbox as displayed below in screen and click Save button
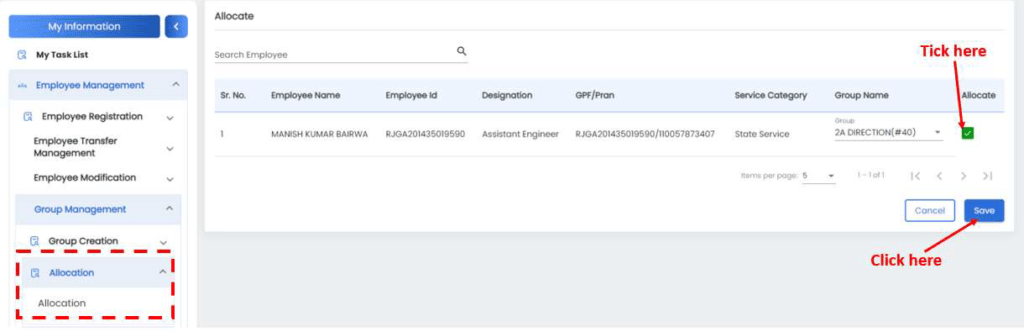
- Click Yes button to Submit Request

- Success message gets displayed

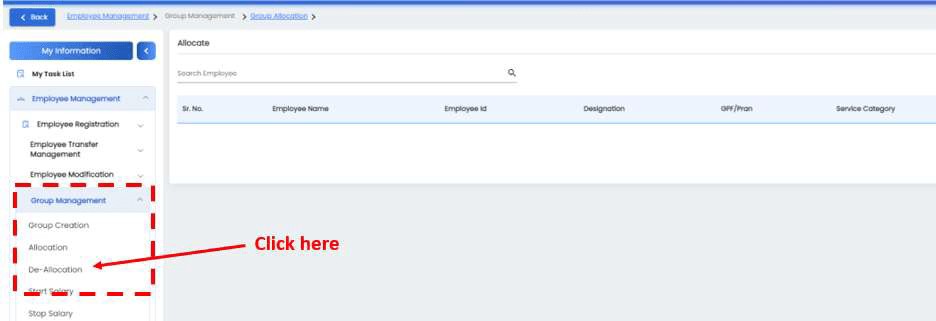
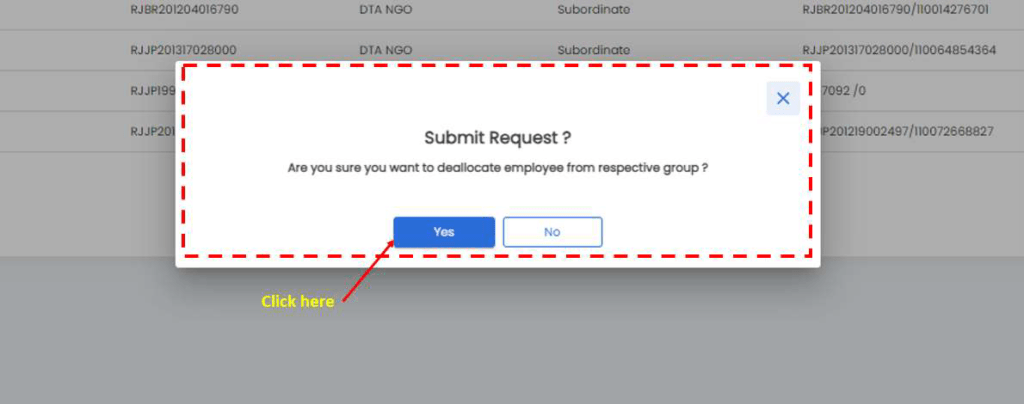
Group De-allocation
This activity can be used if DDO want to shift any employee to another group, first he/shemust de-allocate employee than allocate the group by using ‘Allocation’ option of group management. This functionality will be used to stop salary of a particular employee for a particular month by de-allocating the employee from the group.
Click “Employee Management>> Group Management >> De-allocation from the menu (Left side)
- Click on De-allocation button to De-allocate the Post from particular employee as shown in screen below
- Group Name list gets displayed, with hyperlink, User needs to click on the Group Name
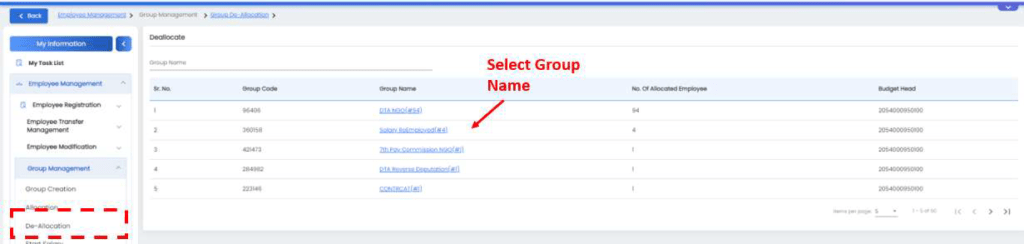
- List of Employees under selected Group gets displayed
- Functionality for “Search” button is provided for User’s to easy search of required details of Employee via Group Name and Employee

- This feature can be used to update the allocation of post to map with another post.
- Check the De-allocate box for the employee that needs to be Deallocated from the group and click Save button.

Click Yes button to the Submit request confirmation message
- Successful message screen gets displayed
